
I used the blue polish first. For this design, I painted my nails with 2 coats of Arte Clavo Black gel polish, curing in between each coat. Next, I painted on a thin coat of the blue polish. When applying the polish, I noticed that some of the glitter in the polish was pretty chunky, so before I cured my polish, I tried to flatten out any of the bumps or glitters that weren't laying flat. I just used the brush from the polish bottle. I wiped all the polish off the brush, and ran the brush on my nails (in the same manner you would if you were applying polish). I cured this coat, and repeated the steps above for the next coat. I had full coverage in two thin coats. Here's how my nails look at this point:
This polish is beautiful!
We got a break in the rain we've been having so I ran outside for another picture!
You can see the blue to purple shift in this picture, but not much of the holo since we didn't have much sun.
I wore this polish for a couple days, mostly to test the wear. It wore great! No chipping or lifting anywhere! It has 3 colors in the shift: Blue to purple to pink. As I kept looking at my nails, I thought this polish was perfect for galaxy nails. Only problem was I had never attempted gel galaxy nails. I started out by removing my polish, and putting black gel polish on all my nails. Using a small piece of a makeup sponge and some tweezers, I sponged on some light pink, light mint green, and the blue chameleon glitter. Once I was happy with my design, I cured them and topped them with a coat of No Wipe top coat (I use Born Pretty Store's No Wipe top coat, found here). Next, I used a small nail art brush and painted on a couple stars as well as some little white dots for tiny stars, and sealed that in with one more thin coat of No Wipe top coat. Here is my final look:
The holo wasn't showing up much on my camera, but it was definitely there in person!
We still don't have much sun, but you can see the blue to purple shift in these two pictures.
For the pink color, I started out the same way I did as with the blue, two coats of Arte Clavo Black gel polish. The pink polish was also a little chunky if I applied it too thick, so I used the same process as I did with the blue. I got full coverage with two thin coats of this one as well. Here is how they look:
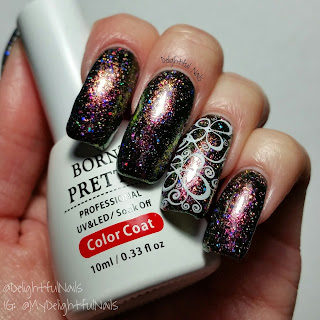
The shift in this polish seems a bit stronger than in the blue polish. It could be because the colors aren't as close to each other as in the blue polish. This one shifts from pink to gold to green.
I love that you can see all 3 colors of the shift in this picture!
I decided to do a little stamping over this polish since it feels like I haven't stamped for a while. I chose an older plate this time, but it is still one of my favorite images! I used Born Pretty plate BP-17. It is such an old plate, I couldn't even find it on the Born Pretty website. I didn't want to do too much stamping because I absolutely love this polish and I didn't want to cover much of it up. I decided to only stamp my ring finger and my thumb. I used Mundo de Unas stamping polish in white, and sealed in my design with one more thin coat of No Wipe top coat. Here is my final look:
Overall, I absolutely LOVE these polishes! I can't stop looking at my nails!! The only thing that I noticed with them was the chunkiness of the glitter. But if you slow down a bit, and do thin coats, it is not too bad and you can work with it and minimize any bumps you might have. After trying these two, I will for sure order more of the colors. This polish comes in 8 different colors so there is sure to be a color you will like! You can find them on the Born Pretty
Store site, here.
I showed you #2 and #8. They also have tons of other
great nail art supplies. Don't forget to use my coupon code for 10% off any regular priced items.


No comments:
Post a Comment