Sunday, January 14, 2018

Born Pretty Store Thermal Shimmer Glitter Color Changing UV Gel Polish Review

In this post, I will be reviewing the Thermal Shimmer Glitter Color Changing UV Gel Nail Polish from BornPrettyStore. I saw these polishes not too long ago, and they caught my eye. I am really excited to try them out. Let's take a look at the bottle:
 
 I really like the gradient color on the bottle. I thought it made the bottle stand out more than the plain white bottles.

This polish is packed full of silver glitter. I can't wait to see what it looks like on, and see the color shift! I painted 2 thin coats of this polish on my nails, curing in between coats. After I cured the second coat, I finished it off with one coat of BornPrettyStore no-wipe top coat (found here). My hands are usually cold this time of year, so here is how it looks so far:
That blue is so pretty!

To see the color shift, I warmed my hands up in very warm water. Here is how it looks warm:


As my hands started to cool off, you could see the polish changing color. This is my favorite part of thermal polish:

I wanted to add just a little bit of a design to an accent nail. I chose an image from Love & Marriage 1 plate by UberChic Beauty. I used Mundo de Unas white for my stamping polish. After I stamped my design on and cleaned up around my cuticle, I sealed in the design with one thin coat of no wipe top coat. Here is the final look:
 
 
Once again, to get the color shift, I had to warm my hands up in warm water.

Overall, I am so glad I got to try this polish. It was everything I had hoped for, and then some. I can't wait to use it again. I am thinking about ordering more colors as well. The polish went on nice and smooth, it self-leveled very nicely, I didn't experience any chipping in the few days that I wore it, and I can't wait to wear it again! I have nothing but good things to say about this polish! You can find this polish on the BornPrettyStore website here. This polish comes in over 20 different colors. The color I have shown you is #5746. They also have tons of other great nail art supplies. Don't forget to use my coupon code for 10% off any regular priced items.


Until next time,


Born Pretty Store Chameleon & Silver Mirror Gradient Powder Review

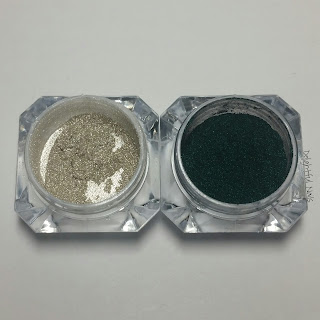
In this post, I will be reviewing the Chameleon & Silver Mirror Gradient Powder from BornPrettyStore. I have seen a couple videos on YouTube of people doing powder gradients, but I have never tried one. I am excited to see how it goes. Let's take a look at the powders first:
 
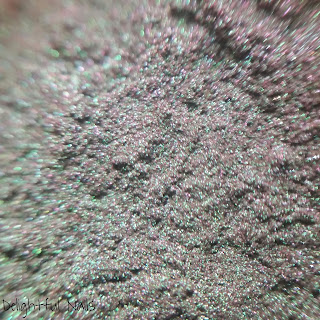
When I first saw the darker powder (above), I wasn't sure how things would turn out, but when the powder is directly under the light, it isn't as dark as it first seemed. It has a very prominent green to purple shift in the container.

To start this look off, I painted all my nails with Color Club Where's the Soiree (black) and topped them with Seche Vite. After about 30 minutes, one nail at a time, I painted on a thin coat of BornPrettyStore no-wipe top coat (found here) and cured it. I used the eyeshadow applicator and using one side of it, I started out with the darker green to purple powder. It only takes a tiny bit of powder, and I rubbed it into my nails, only going about half to 2/3 of the way to the tip of my nail. On the rest of my nail, I used the other side of the applicator and rubbed the silver into the tip of my nail, trying to blend it together. I added a coat of top coat, cured it, and did one more coat of the two powders, then sealed it in with one thin coat of top coat and cured it. I repeated the process on the rest of my nails. Here is my final look:
They are so shiny and pretty! I love this way more than I thought I would when I first started!

I actually liked this so much, I decided I didn't want to cover any of it up with nail art. It was absolutely stunning!

Overall, this was so much easier than I originally thought it was going to be. It was a bit overwhelming before I started, but I decided the only way to do it was to just jump right in and start. If I messed up, I could start again and know what I did wrong. But it was sooooo easy! I have had so many compliments on my nails (I wore this powder for a couple days). The chameleon shift is very strong, and I had no issues at all getting the silver to have a shiny mirror-like finish. this powder set is a must-have for anyone. And everyone!!! One thing I noticed was that you don't get much of the silver powder, but it takes so little powder to get full coverage and a mirror finish, it will still last for several manicures. You can find this powder on the BornPrettyStore website here (I showed you color #3, there are 8 colors total). They also have tons of other great nail art supplies. Don't forget to use my coupon code for 10% off any regular priced items.


Until next time,


Born Pretty Store Holographic Chameleon Unicorn Mermaid Nail Powder Review

In this post, I will be reviewing the Holographic Chameleon Unicorn Mermaid Nail Powder from BornPrettyStore. This pigment looks so pretty on the website AND in person. Take a look:
 
It looks so pretty and sparkly. I can't wait to see what it can do!

To start off, I painted my index and pinky fingers with Essie Licorice, and my two middle fingers with OPI Alpine Snow. I topped them all off with a coat of Seche Vite. After about 30 minutes, I knew everything was nice and dry and it was time for the next step. One finger at a time, I put on one coat of BornPrettyStore's no-wipe top coat (found here) and cured it. Then I used the eyeshadow applicator that came with the powder and applied a small amount of powder to my nail, rubbing it in until I was happy with my coverage. I did two coats of no-wipe top coat, followed by powder, and sealed it in with one more thin coat of top coat. Here is what the powder looks like over black and white:
 
 
 I LOVE how the powder looks over white!

As with all the mermaid and unicorn powders I have, I love to see what they do over different colors. For this powder, I chose to use a pretty medium blue. I used three thin coats of Sinful Colors Why Not. I painted my ring finger with two coats of Essie Licorice. I have something special planned for this finger :). I topped them all off with one coat of Seche Vite. Here is how they look at this point:
After 30 minutes, i repeated the process above for all my nails except my ring finger. For that finger, I rubbed a thin coat of the powder over my clear jelly stamper head. Once the head was evenly covered with powder, I used my BornPrettyStore stamping polish in blue (it was a close match to Why Not), and stamping plate Love & Marriage 1 from UberChic Beauty. I painted my stamping polish on the image I chose, scraped the excess away, and using the stamper with the powder rubbed on the head, I picked up the image and stamped it on my ring finger. I waited a minute or two for the image to dry on my nail, I cleaned up the cuticle area, and then i used a dry Q-Tip to try to remove the powder that transferred onto the black where I didn't want it. Once cleaned up, I sealed my design in with one coat of no-wipe top coat. Here is my final look:
 
I love this! It is so pretty!

Overall, I am completely in love with this powder! You can do so much with it! It was easy to work with, and is absolutely beautiful. If you like holo, or if you like unicorn or mermaid powders (or if you have never tried them), this powder is highly recommended!! You can find this powder on the BornPrettyStore website here (I showed you color #1, there are 6 colors total). They also have tons of other great nail art supplies. Don't forget to use my coupon code for 10% off any regular priced items.


Until next time,


Born Pretty Store Purple Holographic Pigment Powder Review

In this post, I will be reviewing the Purple Holographic Pigment Powder from BornPrettyStore. This powder looks so pretty, and I love all things holo! Let's jump right into it:
 
As with all their powders, it comes with an eyeshadow applicator
 
 
Ooh, look at all the holo! I can't wait to see what this looks like on my nails!

To start off, I painted all my nails with Essie Licorice and topped them off with Seche Vite. After about 30 minutes, I was sure my nail polish was dry all the way through, and it was time to see the magic happen. I painted on one coat of my favorite no-wipe gel top coat (it is from BornPretty, and you can find it here), and cured it. Before I go any further, I have to mention that if you have tried to use these powders with no-wipe top coat and are using a battery operated UV or LED light, you may have experienced some frustrations. I know I did. I just recently switched to a plug in light, and every single frustration is gone. My light made a world of difference, so if you don't have a plug in light, definitely invest in one!!!! Anyway, I used the eyeshadow application, and just a very small amount of powder. I rubbed it into my nails, doing the top coat and powder one nail at a time. I did 2 coats of top coat and powder on each nail, and sealed it in with one last coat of top coat. Here is how they look now:
 
Look at that rainbow!!!!

I also wanted to see what it would look like over a purple polish. I used Sinful Colors Mesmerize, topped with Seche Vite. After 30 minutes, I repeated the process above, one nail at a time. 
Here is how it looks over a dark purple:
I don't really see much difference, but I think my purple was too dark. I also don't know why the holo didn't show up on my middle finger in the picture, because it was very strong in person.

Overall, I love this holographic powder. The holo is super strong and it went on very smooth. This powder was very easy to work with. It doesn't take much powder at all to get full coverage on your nails. If you love powder pigments, holographic, or both, you should definitely get this powder! It is so worth it!! You can find this powder on the BornPrettyStore website here. They also have tons of other great nail art supplies. Don't forget to use my coupon code for 10% off any regular priced items.


Until next time,


Born Pretty Store Christmas 3D Nail Stickers Review

In this post, I will be reviewing the 3D Christmas nail stickers from BornPrettyStore. This item comes with one large sheet of multi-colored Christmas stickers. First, lets take a look at the stickers:
 
 The multi-colors are what caught my eye. They are so cute!

I thought these stickers would look best over a dark base color, so I started out with two coats of Essie Licorice, topped with a coat of Seche Vite. Once I was sure everything was dry, I picked out the stickers I wanted to use. They were a little difficult to get off the sheet. I used the pointy end of my cuticle pusher to lift a corner of the sticker, then used my tweezers to pull them off the plastic backing and place them on my nails. Once I figured out the easiest way to pull them off, it wasn't too bad at all. I placed all the stickers on my nails where I wanted them (they are very sticky, so be careful to get your placement right the first time). I sealed them in with one more coat of top coat. Here is what my design looks like:
I love how colorful they are!

Overall, I think these stickers are absolutely perfect! There are TONS of them and the design options are literally endless! They don't feel like the cheap stickers you normally get. These are super sticky and I didn't have any issues getting them to lay flat on my curved nails. They are nice and thin, but not so thin that they rip when you pull them off the backing. And I love how they have a 3D look to them. They are different than any other stickers I have seen. If you love color and festive designs, I would highly recommend these to anyone! They are so simple to use. You can find these decals on the BornPrettyStore website, here. They also have tons of other great nail art supplies. Don't forget to use my coupon code for 10% off any regular priced items.


Until next time,