Friday, October 13, 2017

Born Pretty Store Chameleon Unicorn Matte Effect Nail Powder Review

In this post, I will be reviewing some Chameleon Unicorn Matte Nail Powder from BornPrettyStore. When I first saw the container, I thought it looked VERY similar to several other powders I have. Let's take a look at the powder first:

 Doesn't it look a lot like most of the other light, shimmery powders? Let's open it up!


Since I can't really tell what effect it will have, I wasn't overly excited about this powder. At first. Like most of my powders, I need to see what it looks like over a few different colors so I can get an idea of what to do with it.

I started out by painting my index finger with Sally Hansen Insta-Dri Re-teal Therapy, my middle finger was Sinful Colors Go Go Boots, my ring finger was Sinful Colors Midnight Blue, and my pinkie was Sinful Colors Pink of Me. Then I topped them all with Seche Vite. Here's what they look like so far:

Once that was nice and dry, one nail at a time, I put on a coat of No Wipe top coat, cured it, and wiped it with rubbing alcohol. Then I rubbed a thin layer of powder into my top coat. Once I was happy with the results, I moved on to the next nail. Here is each color topped with powder:

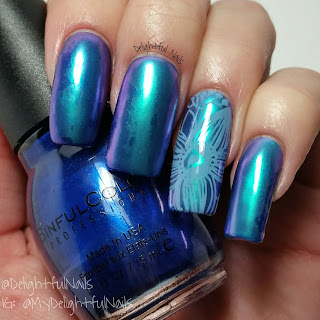
This is a tough choice. I really liked the purple and the blue. I decided to go with the blue since that one showed the biggest change in polish color. Here are my nails painted in Midnight Blue, and topped with Seche Vite:

In this next picture, I applied the powder on my middle and pinkie fingers so you can see how much of a change there was:
I love the effect the powder has on the blue polish!

I finished applying the powder and took another picture so you could see what the powder looks like matte first:

 In this one, you can see the purple on my index finger, and some on my middle fingers, and the blue effect on my middle fingers and pinkie. 

Let's add some top coat so you can see this powder glossy as well:
 I like it both ways, but over the blue, I prefer the matte look. What do you think?

To finish my look, I decided to stamp my ring finger with a flower from Born Pretty Store plate BP-L011. I stamped with Born Pretty Store stamping polish in light blue. You can see my review of that polish here. I added one more coat of No Wipe top coat over my stamp to seal it in. Here is my final look

Overall, this powder really surprised me! I am super impressed with it, and it is definitely close to the top of my favorite powders list. If you also enjoy powders and chameleon nails, I would highly recommend this powder. You get a ton of powder in the container and for an awesome price!!! Don't pass this one up! If you purchase all 4 colors, you get a deal you almost can't refuse!! And they are all very pretty! You can find this chameleon powder on the BornPrettyStore website here. This powder comes in 4 different colors. The color I chose was #2. They also have tons of other great nail art supplies. Don't forget to use my coupon code for 10% off any regular priced items.


Until next time,


Born Pretty Store Champagne Silver Mirror Shimmer Nail Powder Review

In this post, I will be reviewing the Champagne Silver mirror shimmer nail powder from BornPrettyStore. This powder caught my eye because it is one of the mirror powders that shows the tint of the polish underneath it. I think they look so neat and you have endless options with them. Let's take a look at the powder:
I can't wait to open this up and see what it looks like!
 
It is so sparkly! I can't wait to see what it looks like!!

The first thing I wanted to do was see what this powder looked like over different colors. The colors I chose are all Sinful Colors. On my pinkie, I used Mad About Hue. Then I chose Curry Up for my ring finger, Pink of Me for my middle finger, and Jolt for my index finger. Each nail got two coats of polish, topped with one coat of Seche Vite. I waited 10-15 minutes to make sure my polish was completely dry throughout, then doing one nail at a time, starting with my pinkie, I painted on a coat of No Wipe topcoat and cured it. Once cured, I wiped it off with rubbing alcohol (that seemed to be the trick for me to get that mirror finish) and applied a very light amount of powder to the eyeshadow applicator and rubbed it into my nail. Once I was happy with my results, I followed the same steps for the rest of my nails. Here are my results of my color test:
Notice the wrinkle on my ring finger? I had to redo this nail and I didn't wait long enough before I applied my gel top coat. This is that horrible wrinkling I keep mentioning!! I decided to use this picture anyway so you all could see what I was talking about. And since it was just a color test, I was still able to see what each of the colors looked like

I was pretty stuck between the blue and the purple. I really like how they both look! I decided to go with the purple. Here are my nails painted with Sinful Colors Mad About Hue and topped with Seche Vite, ready for the powder:

And here they are with the powder on:
 
I decided to do a gradient stamping on my two middle fingers. I used plate BP-07, which you can find here. I stamped with Mundo de Unas #15 Mexican Pink and #49 Lavander. I topped these with No Wipe Gel top coat. Here is my final look:

Overall, I really like this powder. I love how you can use different colors under it and it completely changes the look. You can do so much with it! It was very easy to work with and I have nothing bad to say about it. I really enjoyed it a lot. If you like the look of the chrome powders, this is definitely one you need to try! You can find this powder on the BornPrettyStore website here. They also have tons of other great nail art supplies. Don't forget to use my coupon code for 10% off any regular priced items.


Until next time,


Thursday, October 12, 2017

Born Pretty Store 3D Chameleon Cat Eye Magnetic Soak Off Gel Polish Review

In this post, I will be reviewing some 3D Chameleon Cat Eye Magnetic Soak Off Gel Nail Polish from BornPrettyStore. I received 2 different colors of this polish. Let's take a look at the bottles first:

 As with all gel polish, there isn't much to see. We need to open these bottles up!

So far, I like what I see. I can't wait to get these on my nails!

With these polishes, you will get the best results with a dark base coat. I chose black because it doesn't get any darker than that! I painted on two coats of Wet n Wild Black Creme and topped that with one coat of Seche Vite. I waited a good 10 or 15 minutes to make sure my polish is dry all the way through before continuing (if you use regular polish under gel and don't wait until it is fully dry, when you cure your gel, it will wrinkle. Don't ask how I know!). Once I knew my polish was nice and dry, I did one nail at a time because I am super clumsy and I know I would mess them up if I didn't. I also thought I had the Born Pretty Store cat eye magnet for the magnetic polish, but I couldn't find it anywhere! The only magnet I was able to find was a China Glaze magnet. At this point, I didn't have much choice, so I had to give that one a shot. Here is the magnet I am using:


I painted one thin coat of the magnetic gel polish on my nail, and then I held the 3 line pattern at the top of the magnet very close to my nail. After 10 seconds or so, I slowly moved the magnet across my nail, holding it in the next spot for the same amount of time, until I had the design coverage I wanted. Then, I cured the gel polish. Make sure you don't cure the gel before using your magnet because once you cure it, the magnet won't work. Once that nail was cured, I moved on to the next nail, using the same steps. Here is the first polish. It is a purple to blue to green polish.
 With this polish, I chose to have the lines on my ring finger go the opposite direction. 


Unfortunately, when I took these pictures, it was very cloudy outside so I had to settle for my OttLite only. I was slightly disappointed because I don't feel like I was fully able to capture the chameleon effect of this polish. It is beautiful!!! It is a very drastic change from blue, to a purple, to a purply-pink, and lastly to green. I was unable to get my camera to pick up the green in this polish, but it is definitely there. 

Let's check out the other color and see if it is equally amazing. Once gain, I started off with two coats of Wet n Wild Black Creme and topped it with Seche Vite. Following the same steps as above, I applied the red, to gold, to green polish and used the same magnet. Here is how that one looks:
I got a slight break in the clouds so I rushed outside to get a couple pictures!
This one shows the red, almost a deep reddish pink color. 

In this one, you can see the green start on my index finger by my cuticle, and it looks like a gradient into the red at the tip of my pinkie. 

After that picture, the sun disappeared again, so I was back to my OttLite. Here are the rest I got:

Both polishes perform equally amazing. I think I like the blue to purple better, only because of the color. I like the fall colors, but they aren't my favorite. The polishes themselves are so awesone!!

Overall, these polishes are great! I don't have a lot of experience with a ton of different brands of metallic polishes, but so far, these perform the best!! I actually love these so much, I have ordered another cat eye magnet, along with a couple other magnet shapes/patterns just so I can wear them again and again! There are so many magnet patterns and shapes out there, you could wear magnetic polish all the time, and always have a different design! They even have a pen. YES! A magnetic pen! You can find it here. And while we're at it, here is the link to the cat eye magnet. If you like chameleon or multichrome polishes, or magnetic polishes, I would highly recommend these polishes to you. They come in 3 colors, and you can find them on the Born Pretty Store site, here. I showed you #1 and #2. If you order all 3 colors, you get a great deal, and it comes with a magnet as well!! They also have tons of other great nail art supplies. Don't forget to use my coupon code for 10% off any regular priced items.


Until next time,


Born Pretty Store Platinum Bling Glitter Soak Off Gel Polish Review

In this post, I will be reviewing some Platinum Bling Glitter Soak Off Gel Nail Polish from BornPrettyStore. This polish was picked out for me, and I have to say it is perfect!. Let's take a look at the bottle first:
 As with all gel polish, there isn't much to see. We need to open it up!

Oh my goodness! Look at all that sparkly glitter! 

I can't waste any time, I have to get this on my nails!! I wanted to start of with a base color that was close to grey, just in case this glitter didn't have full coverage. I chose to start with OPI Suzi Takes the Wheel. I painted on two coats and topped it off with one coat of Seche Vite. It looked much more grey in the bottle. I couldn't wait long enough to switch my base color so I crossed my fingers for full glitter coverage and continued. But first, here's how my nails look at this point:


Next, I painted on one coat of the glitter gel polish and cured it. For full coverage, I did one more coat and cured it once again. Then I topped it with a No Wipe top coat. WOW!!!! I have a new favorite polish!

Look at that sparkle! I am so glad I had a sunny moment to get a picture!
We need a closer look :)

This was inside under my OttLite. You can see the silver glitter is packed with holo glitter! 

My nails were almost too sparkly. Is that even possible? I decided to stamp an accent nail. I used Born Pretty Store plate BP-L024, which can be found here. I stamped with Mundo de Unas black, and sealed it in with one coat of Seche Vite. Here is my final look:
 

I ended up wearing this polish for 2 days because I loved it so much. As expected, it wore great. It didn't show any signs of wear or chipping.

Overall, this polish is up there in my top favorites. I fell in love with it the moment I first opened the bottle, and it never once disappointed me. If you love glitter polish, and you like gel polish, you need this one in your collection. And the price is unbeatable! You can find this polish on the BornPrettyStore website here. This polish comes in 5 different colors. The color I have shown you is #2. They also have tons of other great nail art supplies. Don't forget to use my coupon code for 10% off any regular priced items.


Until next time,


Born Pretty Store Holographic Chameleon Peacock Mirror Nail Powder Review

In this post, I will be reviewing the Holographic Chameleon Peacock Mirror Nail Powder from BornPrettyStore. I was immediately drawn to this powder because, HOLO!! I am so addicted to everything holographic, and I am loving all these awesome powders. I can't wait any longer, we need to see this magic:
 So far, I can see the chameleon effect, but I don't see the holo. We need to open it up!

 It is very pretty, but it HAS to be magic because I don't see the holo yet.

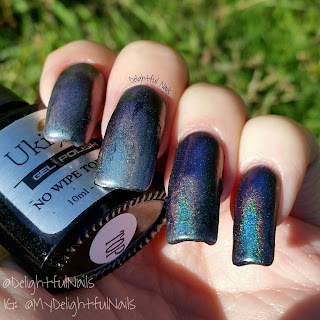
Since this is a darker powder, I didn't test it over different colors. I went straight for black. To start off, I painted my nails with two coats of Wet n Wild Black Creme and topped them off with one coat of Seche Vite. I have tried black gel polish and I just don't like it as much as regular polish. I don't know what I did wrong, but every time I try it, as soon as I use my No Wipe top coat and cure it, my black gel wrinkles. Anyway, I waited at least 10 minutes after I applied my Seche Vite, to make sure my polish was nice and dry throughout. Then, one nail at a time, I applied a coat of No Wipe gel top coat and cured it. Once cured, I wipe my nail with rubbing alcohol (I don't know why, but that seems to be the trick for me to get the mirror effect). Using the eyeshadow applicator that came with the powder, I get just a small bit of powder on the applicator and rub it into the No Wipe top coat. The less you use, the better the mirror effect! Once I was happy with my coverage, I repeated the above steps to apply one more coat of powder on the nail, and top it with gel top coat and cure it. Then repeat all the steps for the next nail, and so on. It was pretty overcast outside, and I was struggling to get some good pictures with the holo in all its glory.
 
 In this picture, you can see the effect on my pinkie the best
(When you look at the nail, the spot you are looking just looks mirror, and around the sides of the mirror look you will see the intense holo)

This holo is so intense and amazing, I think my camera was also having a hard time with all the color :)

I noticed that my ring finger had a slightly patchy look to it at certain angles, but nothing a bit of stamping can't fix! Haha!! I decided to use Born Pretty Store plate BP-L011, which you can find here. I stamped with Mundo de Unas  #12 Cream. Then I sealed the design in with one coat of Seche Vite. Here is my final look:


I chose this part of the image because the big flower is pretty open so you can still see quite a bit of the powder underneath.

Overall, I absolutely LOVE this powder! It comes in 8 different colors and would definitely be worth buying in all of your favorites! The container seems like it doesn't have much powder in it, but it only takes a tiny bit. You have plenty of powder to get several uses out of it. I can't say anything bad about this powder. At all. If you like powders, chameleon, and holo, this is a MUST HAVE! You can find this powder on the BornPrettyStore website here. They also have tons of other great nail art supplies. Don't forget to use my coupon code for 10% off any regular priced items. 


Until next time,